
One of my responsibilities as the Biodiversity Informatics Manager for Canadensys is to develop a data portal giving access to all the biodiversity information published by the participants of our network. A huge portion of this task can now be done with the GBIF Integrated Publishing Toolkit version 2 or IPT. The IPT allows to host biodiversity resources, manage their data and metadata, and register them with GBIF so they can appear on the GBIF data portal, which are all targets we want to achieve. Best of all, most management can be done by the collection managers themselves.
I have tested the IPT thoroughly and I am convinced the GBIF development team has done an excellent job creating a stable tool I can trust. This post explains how I have customized our IPT installation to integrate it with our other Canadensys websites.
Background
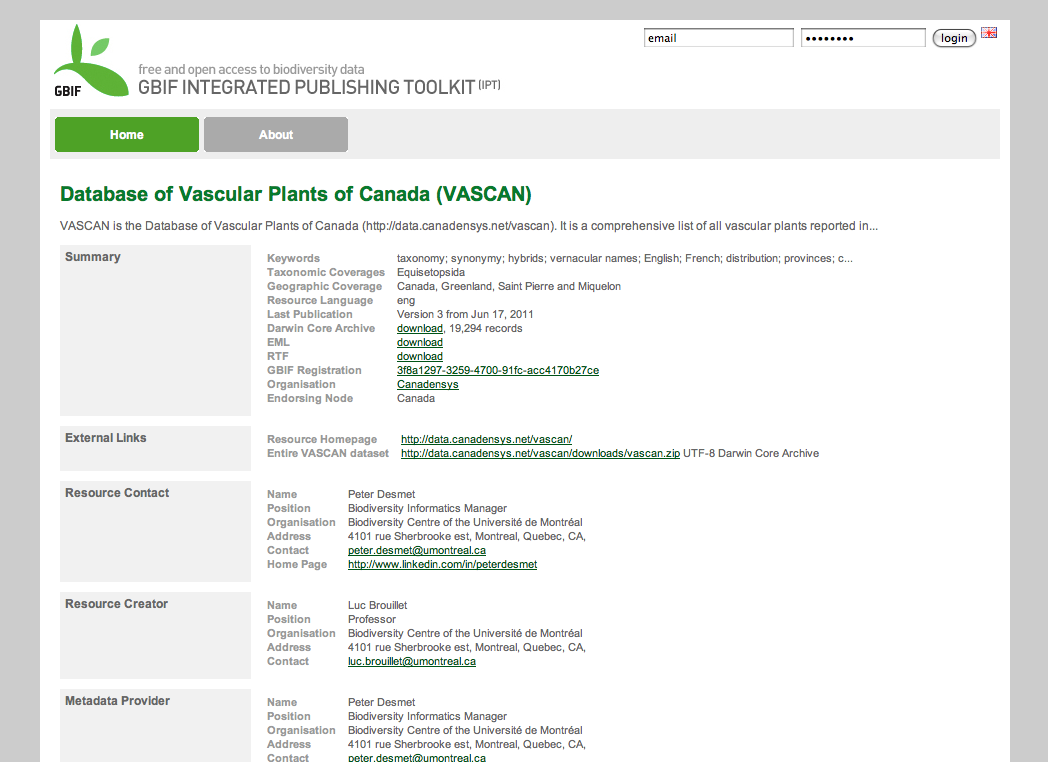
Our Canadensys community portal is powered by WordPress (MySQL, PHP), while our data portal - which before the IPT installation only consisted of the Database of Vascular Plants of Canada (VASCAN) - is a Tomcat application. We are using different technologies because we want to use the most adequate technology for a certain website. WordPress (or Drupal for that matter) is an excellent and easy-to-use CMS, perfect for our community portal, but not suitable for a custom made checklist website like VASCAN. To the user however, both websites look the same:


We do this by using the same HTML markup and CSS for both websites. If you want to learn HTML and CSS, w3schools provides excellent tutorials.
The HTML markup defines elements on a page (e.g. header, menu, content, sidebar, footer) and the CSS stylizes those elements (e.g. their position and color). The CSS is typically stored as one file (e.g. style.css) which is referenced in the <head> section of a page. For dynamic websites, the HTML is typically stored as different files, one for each section of a page (e.g. header.php, sidebar.php). Those files are combined as one page by the server if a page is requested. That way, changing a common element on all pages of a website (e.g. the header) can be done by changing just one file.
All of this also applies to the IPT. Here's how the IPT looks like without CSS:

Attempt 1 - Editing the CSS and logo
My first attempt at customizing the IPT was at the Experts Workshop in Copenhagen, by changing the CSS and logo only, which you can find in the /styles folder of your IPT installation:
/styles/main.css

/styles/logo.jpg
In 15 minutes, my IPT was Canadensys red and had a custom logo:

Attempt 2 - Editing the FreeMarker files
Even though my IPT now had its own branding, it was still noticeably different from the other Canadensys websites. The only way I could change that, was by editing the HTML as well. Luckily, the sections I wanted to change were all stored as FreeMarker files in the /inc folder:
/WEB-INF/pages/inc/header.ftl - the <head> section

/WEB-INF/pages/inc/menu.ftl - the header, menu and sidebar

/WEB-INF/pages/inc/footer.ftl - the footer

/WEB-INF/pages/inc/header_setup.ftl - the header during installation
I incorporated the HTML structure I use for the VASCAN website into menu.ftl (including the header, menu, container and sidebar), making sure I did not break any of the IPT functionality.
I started doing the same with main.css by replacing chunks of now unused IPT CSS with CSS I copied over from VASCAN, but I quickly realized that this wasn't the best option. Doing so would result in 2 CSS files: one for VASCAN and one for IPT, even though both web applications are under the same domain name with a lot of shared CSS. It would be easier if I only had to maintain a single stylesheet, used by both applications.
Attempt 3 - One styles folder for the data portal
I created a /common/styles folder under ROOT, where I placed my single common data portal stylesheet: /common/styles/common.css. This would be the CSS file I could use for IPT and VASCAN. I did the same for my favicon: /common/images/favicon.png.
I added a reference to both files in the header.ftl of my IPT (and VASCAN):
<link rel="stylesheet" type="text/css" href="${baseURL}/styles/main.css">

<link rel="stylesheet" type="text/css" href="http://data.canadensys.net/common/styles/common.css">

<link rel="shortcut icon" href="http://data.canadensys.net/common/images/favicon.png">
As you can see on the first line, I kept the reference to the default IPT stylesheet: ${baseURL}/styles/main.css (it's perfectly fine to reference more than one CSS file). This is where I would keep all the unaltered (=default) IPT CSS. In fact, I'm not removing anything from the default IPT stylesheet, I'm only commenting out the CSS that is unused or conflicting:
/* Unused or conflicting CSS */The advantage of doing so, is that I now easily can compare this commented file with changes in the stylesheet of any new IPT version.
After I had done everything, my IPT now looked like this:


My IPT is now sporting the Canadensys header, footer and sidebar (only visible when editing a resource), making it indistinguishable from the other Canadensys websites. It is also using a more readable font-size (13.5px) and a fluid width.
Closing remarks
I have (re)designed quite a lot of websites, and very often I have been so frustrated with the HTML and CSS that I just started over from scratch. I didn't have that option here and it wasn't necessary either. I would like to thank the GBIF development team for creating such an easily customizable tool, with logical HTML and CSS. As a reminder, the whole customization has been done by editing only 5 files (links show default files):
/styles/main.css (custom file)

/WEB-INF/pages/inc/header.ftl

/WEB-INF/pages/inc/menu.ftl

/WEB-INF/pages/inc/footer.ftl

/WEB-INF/pages/inc/header_setup.ftlImportant: Remember that installing a new IPT version will overwrite all the customized files, so make sure to back them up! I will try to figure out a way to reapply my customization automatically after an update and post about that experience in a follow-up post. In the meantime, I hope that this post will help others in the customization of their IPT.


Great work Peter!.
ReplyDeleteThis kind of ideas encourages us to continue developing better applications.
Nice!
ReplyDeleteEven more, you may change the marker icon from the geocoverage map by editing the link to the marker in
/WEB-INF/pages/manage/eml/geocoverage.ftl
change the url in the value of
(line 61) var markerIcon = 'http://www.google.com/intl/en_us/mapfiles/ms/micons/green-dot.png';
This is excellent Peter... gives me an idea for a post about HIT customization :) well done!
ReplyDelete